Streamed away (in Real-Time)!
Siddhant Shrivastava
July 16, 2015
Filed under “GSoC”
Hi! This post is all about Video Streaming and Cameras :-) If you’ve wondered how services like YouTube Live or twitch.tv work, then this post is for you. After the Innsbruck experiments and Remote tests in Telerobotics, it was time for me to create a full-fledged Real Time Video Streaming solution for the ERAS project. After a lot of frustration and learning, I’ve been able to achieve the following milestones -
- Stream losslessly from a single camera in real-time to a Blender Game Engine instance.
- Create example Blender projects to test multiple video sources streaming over a network.
- Record a live stream from a stereoscopic camera into a side-by-side video encoded on the fly.
It’s going to be a very long post as I’ve been playing around with lots of video streaming stuff. All this experience has turned me into a confident Multimedia streamer.
Why am I doing this?
Integrating Augmented and Virtual Reality requires one to know the nitty-gritty of Multimedia Streaming. This week was spent in learning and tinkering with the various options provided by FFmpeg and Video4Linux2. One of the aims of the Telerobotics project is to allow streaming of Rover Camera input to the Astronaut’s Head-Mounted Device (Minoru 3D camera and Oculus Rift in my case). The streamed video has multiple uses -
- It is used by the various Tango servers (Planning, Vision, Telerobotics, etc) and processed to obtain Semantic relationships between objects in the Martian environment.
- The video, in addition to the LIDAR and other sensing devices are the interface of the Human world in the ERAS habitat on Mars. The video stream provides a window to Mars.
- The real-time stream helps the astronaut and the simulated astronaut to guide the rover and the simulated rover around on Mars.
- Streaming is an integral component of both ERAS and V-ERAS which we at the Italian Mars Society are currently working on.
Initial Impressions
When I started with 3D streaming, it appeared easy. “I did it with a single camera, two cameras can’t be a huge deal, right!”. I had never been so wrong. I found myself stuck in the usual embedded device vs the Linux kernel interface -
- The hardware of desktop machines are unsuitable for Streaming applications.
- The Kernel is not configured to use multiple webcams
- This results in lots of memory-related errors -
insufficient memory,rt_underflow
To tweak the Minoru camera and strike an optimum settings agreement with this cute little stereo camera, I began to dig into the core software components involved -
Video4Linux2 saves the day!
The Video4Linux is an important driver framework which makes it possible for Linux users to use Video Capture devices (webcams and streaming equipment). It supports multiple features. The ones that this project is concerned with are -
- Video Capture/Output and Tuning (
/dev/videoX, streaming and control) - Video Capture and Output overlay (
/dev/videoX, control) - Memory-to-Memory (Codec) devices (
/dev/videoX)
These slides by Hans Verkuil (Cisco Systems) are and informative entry point for understanding how Video4Linux works.
The different Streaming Modes supported by Video4Linux are -
- Read/Write (Supported by Minoru)
- Memory Mapped Streaming I/O (Supported by Minoru)
- User Pointer Streaming I/O
- DMA (Direct Memory Access) Buffer Streaming I/O
The take-away from Video4Linux is understanding how streaming works. So a Stream requires the following - queue setup, preparing the buffer, start streaming, stop streaming, wait to prepare, wait to finish, compression and encoding of the input stream, transmission/feeding on a channel, decompression and decoding the received stream, and facilities for playback and time-seek.
The Qt frontend to v4l2 made me realize where the problem with the camera lied -
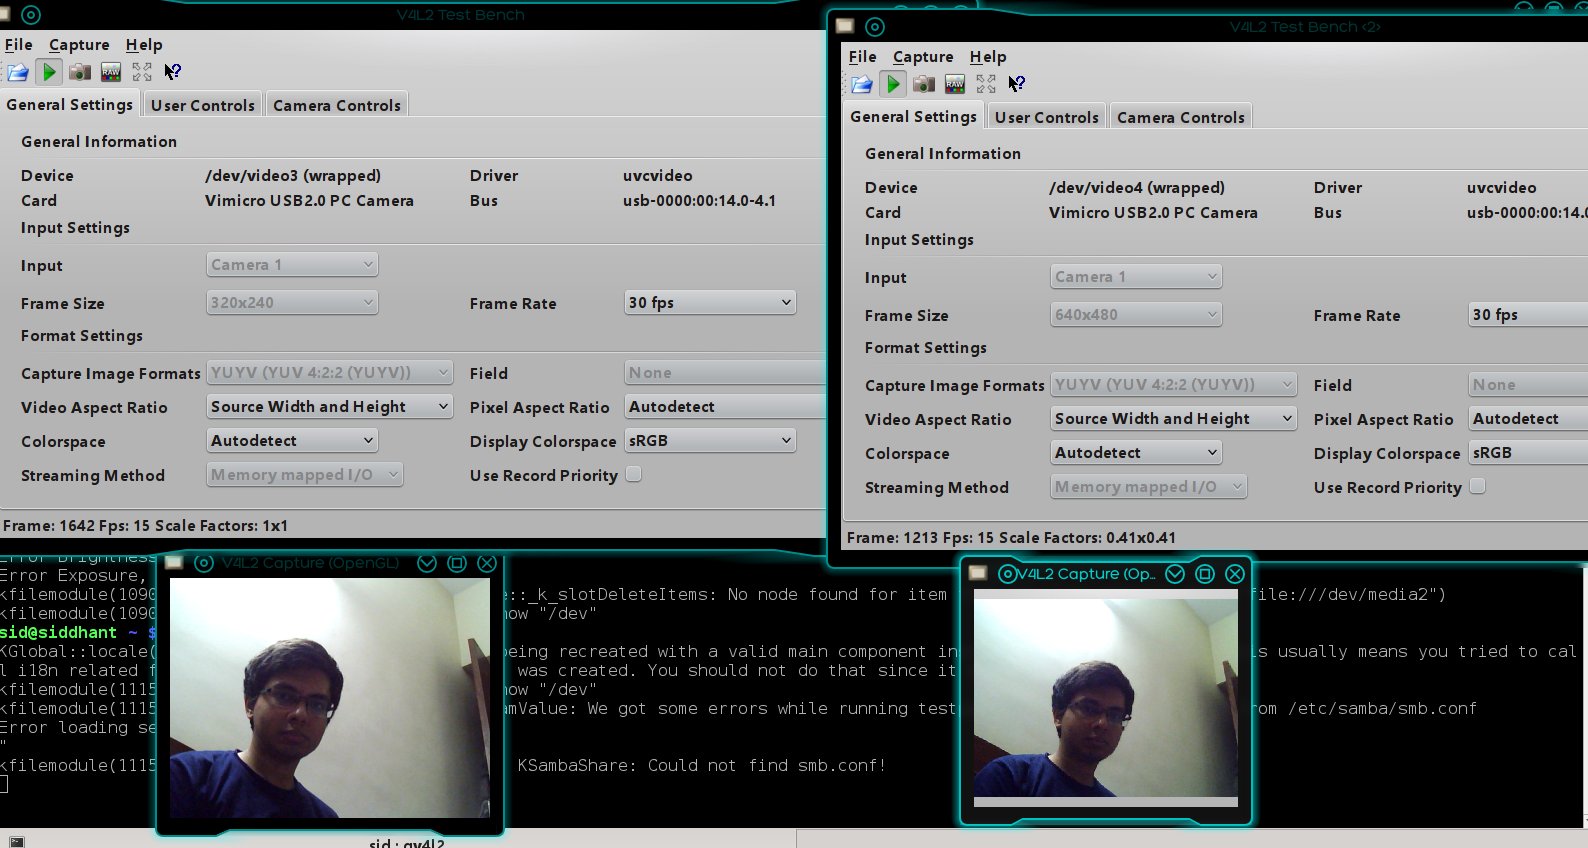
The video4linux2 specification allows for querying and configuring everything about Video Capture Cards. The nifty command-line utitlity v4l2-ctl is a lifesaver while debugging cameras.
For instance, with the Stereo Camera connected, `v4l2-ctl --list-devices gives -
Vimicro USB2.0 PC Camera (usb-0000:00:14.0-1.1):
        /dev/video1

Vimicro USB2.0 PC Camera (usb-0000:00:14.0-1.4):
        /dev/video2

WebCam SC-13HDL11939N (usb-0000:00:1a.0-1.4):
        /dev/video0
v4l2-ctl --list-frameintervals=width=640,height=480,pixelformat='YUYV'
gives
ioctl: VIDIOC_ENUM_FRAMEINTERVALS
        Interval: Discrete 0.033s (30.000 fps)
        Interval: Discrete 0.067s (15.000 fps)
This means that I’ve to use one of these settings for getting input from the camera, and then transcode them into the desired stream characteristics.
Knowing your stereoscopic Camera
VLC carefully configured to stream the Left and Right Minoru Cameras/
Minoru 3D webcam uses the following Color Spaces -
- RGB3
- YU12
- YV12
- YUYV
- BGR3
Explanations ahead…
When colors meet computers and humans
Color Spaces are models of ‘Color Organization’ that enable reproducible representations of color in different media (analog, digital). Color is a human subjective visual perceptual property. Recursing these definitions on Wikipedia took me back to Middle School. Color is a physical (observable and measurable) property. The way us humans see it is not the same as a color sensing photodiodes see it and the computer monitors reproduce it. Translating color from one base to another requires a data structure known as the color space. The signals from the webcam are encoded into one of the color spaces. Just in case you’re wondering - YUV model describes colors in terms of a Luma (luminance) component and two chrominance components (U and V). The 2-D UV plane can describe all colors. YUV can be converted into RGB and vice-versa. The YUV422 data format shares U and V values between two pixels. As a result, these values are transmitted to the PC image buffer only once for every two pixels, resulting in an average transmission rate of 16 bits per pixel. Capturing on the YUV 4:2:2 format is more efficient than RGB formats whereas color reproduction on a pixel array is more convenient via RGB. For the purposes of Video Streaming from a Stereo Camera System like Minoru, using a RGB color space is the best option because it results in faster performance with a codec like MJPEG (Multi-part JPEG) which is the final requirement for the Blender Game Engine stream. I hope this theoretical explanation superveniently describes the challenge I’ve been trying to crack.
FFmpeg built with v4l2-utils support is used for the Stereo Streaming.
Experiments with Blender
I tried capturing the two video devices directly from the Blender Game Engine application. It was a good experience learning about creating basic Blender Games.
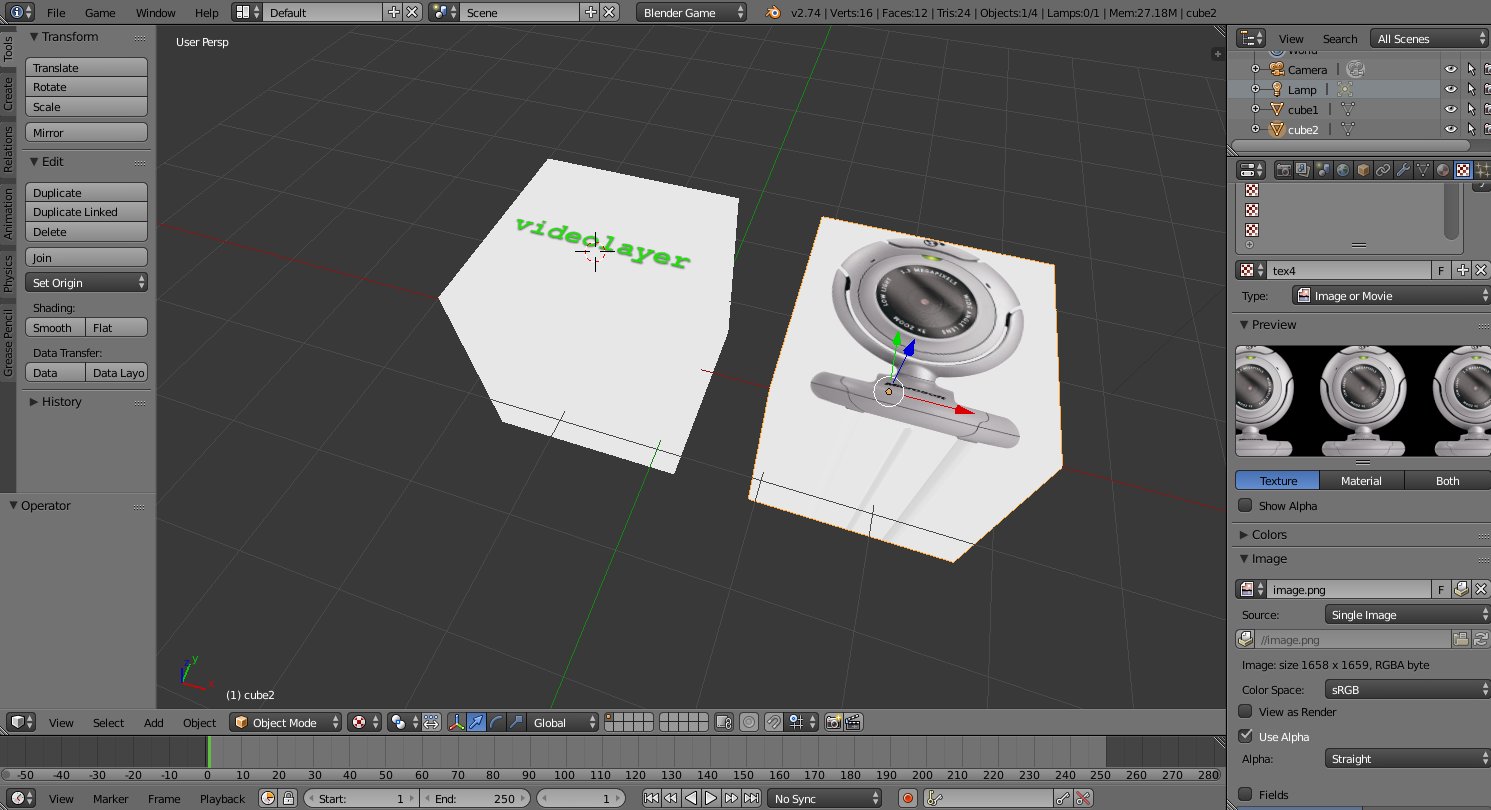
The workflow to this end was -
- Create two Cube Meshes
- Enable GLSL shading mode
- Set Object Shading to
Shadelessto enhance brightness - Add Image Textures to both images/articles/2015
- Add a
sensorthat is triggered toTruealways. - Add a Python script controller corresponding to each sensor.
- The script to control the right camera of the stereo system is -
import VideoTexture
import bge

contr = bge.logic.getCurrentController()
obj = contr.owner

if not hasattr(bge.logic, 'video'):
    matID = VideoTexture.materialID(obj, 'IMimage.png')
    bge.logic.video = VideoTexture.Texture(obj, matID)
    bge.logic.video.source = VideoTexture.VideoFFmpeg("/dev/video2",0)
    bge.logic.video.source.scale = True
    bge.logic.video.source.flip = True
    bge.logic.video.source.framerate = 0.2
    bge.logic.video.source.repeat = -1
    bge.logic.video.source.play()
print("In Video 2 fps: ", bge.logic.video.source.framerate)
bge.logic.video.refresh(True)
But it turns out Blender Game Engine does not provide extensive Video Device control. It relies on the default settings provided by Video4Linux. Since the Minoru camera is unable to stream both camera outputs at 30 frames per second - Blender simply gives in and compromises by playing the first camera output that it receives. Video4Linux simply reports Insufficient Memory for the other stream.
The output could only support one camera at a time -
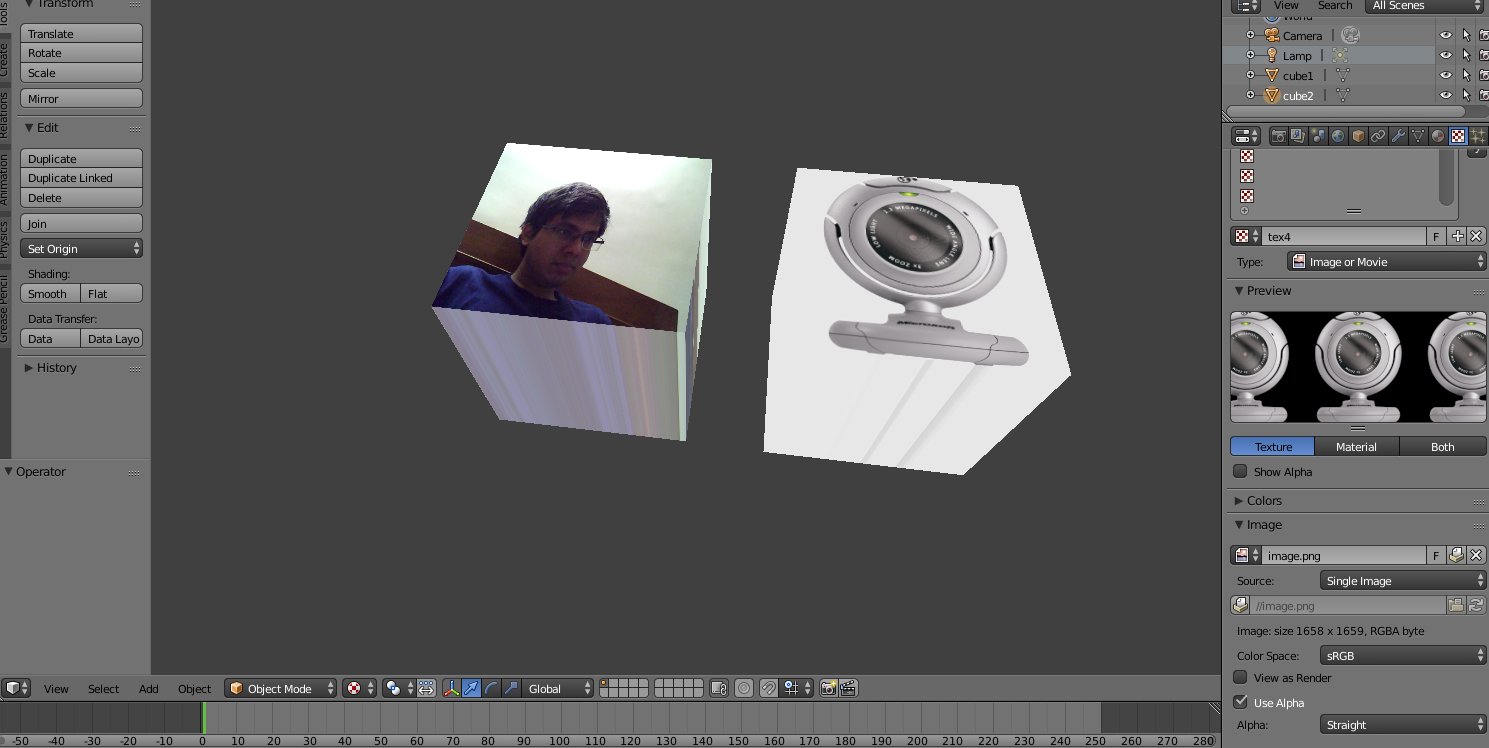
The BGE documentation is ambiguous in the use of the VideoTexture command while controlling webcam devices.
It was an exciting learning experience about contemporary game design nevertheless. The take-away was that Blender Game Engine is unable to handle cameras at the hardware level. Network Streaming with FFmpeg was the only option.
FFmpeg - the one-stop-shop for Multimedia
My search for the perfect tool for streaming ended with FFmpeg. It amazes me how versatile this software is. Some people even call it the Swiss-army knife of Internet streaming. So I had to basically work with Streams.
Streams are essentially Multimedia resources which are identified with the help of a Media Resource Locator (MRL). A combination of ffmpeg and ffserver is what I used to achieve the desired results. The stereoscopic stream produced will be used by multiple applications-
- Streaming to the Head-Mounted Device (currently Oculus Rift)
- Processing Martian environment’s video.
- View in the ERAS application from ground control.
Why FFmpeg?
- It is fast, reliable, and free.
- It provides a complete solution from streaming and transcoding to media playback, conversion, and probe analysis.
Quoting from its documentation -
ffmpeg reads from an arbitrary number of input “files” (which can be regular files, pipes, network streams, grabbing devices, etc.), specified by the -i option, and writes to an arbitrary number of output “files”, which are specified by a plain output static. Anything found on the command line which cannot be interpreted as an option is considered to be an output static.
I tinkered with loads of ffmpeg options and created a lot of useful junkcode. The good thing about GSoC is that it makes you aware of the open-source influences out there. Throughout this work on streaming, I was motivated by the philosophy of Andrew Tridgell who says that “junkcode can be an important learning tool”.
ffmpeg -f v4l2 -framerate 15 -video_size 640x480 -i /dev/video1 outp1.mp4 -framerate 15 -i /dev/video2 outp2.mp4
This resulted in a steady video stream -
A sample of three different frames at
frame= 1064 fps= 16 q=27.0 q=27.0 size=631kB time=00:01:07.06
frame= 1072 fps= 16 q=27.0 q=27.0 size=723kB time=00:01:07.60
frame= 1079 fps= 16 q=27.0 q=27.0 size=750kB time=00:01:08.06
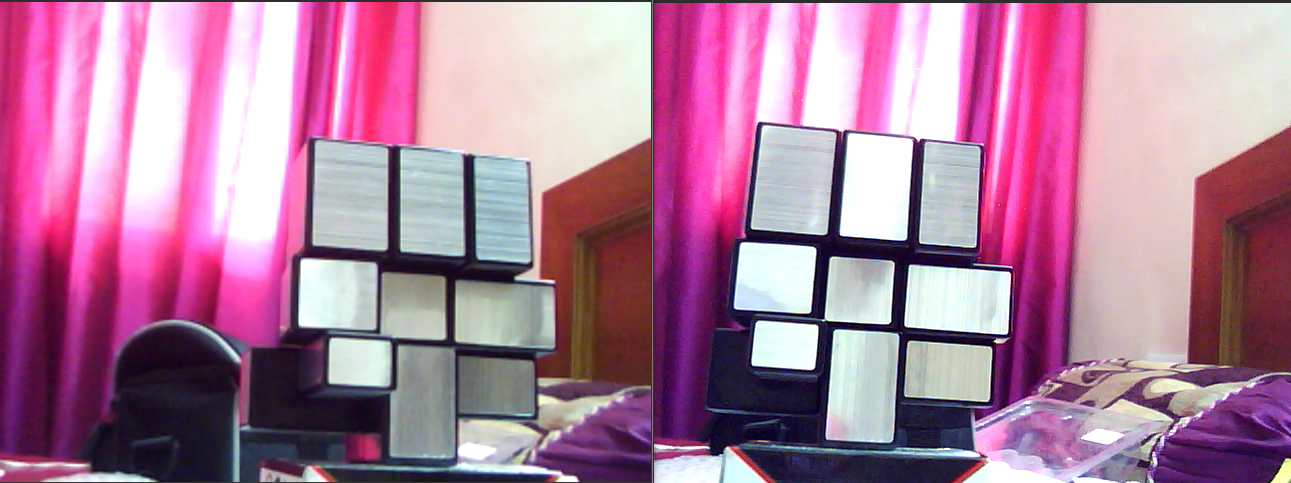
Learning about the ffmpeg-filters made this experience worthwhile. I was not able to overlay videos side-by-side and combine them in real-time. This is the script that I used -
ffmpeg -s 320x240 -r 24 -f video4linux2 -i /dev/video1 -s 320x240 -r 24 -f video4linux2 -i /dev/video2 -filter_complex "[0:v]setpts=PTS-STARTPTS, pad=iw*2:ih[bg];[1:v]setpts=PTS-STARTPTS[fg]; [bg][fg]overlay=w" -c:v libx264 -crf 23 -preset medium -movflags faststart nerf.mp4
It basically tells ffmpeg to use a resolution of 320x240 and 24 fps for each of the camera devices and apply an overlay filter to enable side-by-side video output. PTS-STARTPTS allows for time synchronization of the two streams and the presets enable efficient encoding.
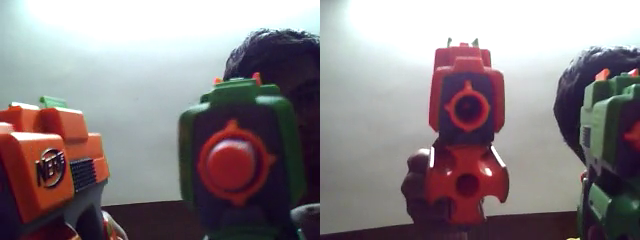
I shot a video using the Minoru video camera. After applying the Overlay filter, I got a nice video with the Left and Right video streams arranged side-by-side. In this screenshot, I am pointing my little brother’s Nerf guns towards each of the Minoru’s two cameras -
I can experiment with the Stereoscopic anaglyph filters to extend it to a single-screen 3D live stream. But the present task involves streaming to the Oculus Rift which is what I’ll be working on next. In addition to ffmpeg, I also made use of ffserver and ffplay in my Streaming workflow. These have been explained in a previous post.
Experiments with v4l2stereo
Working with stereoscopic cameras is atypical to a traditional Computer Vision workflow. Each of the cameras require calibration in order for Range-Imaging applications like depth maps and point clouds to work. I calibrated my camera using the excellent v4l2stereo tool.
Here are some screenshots -
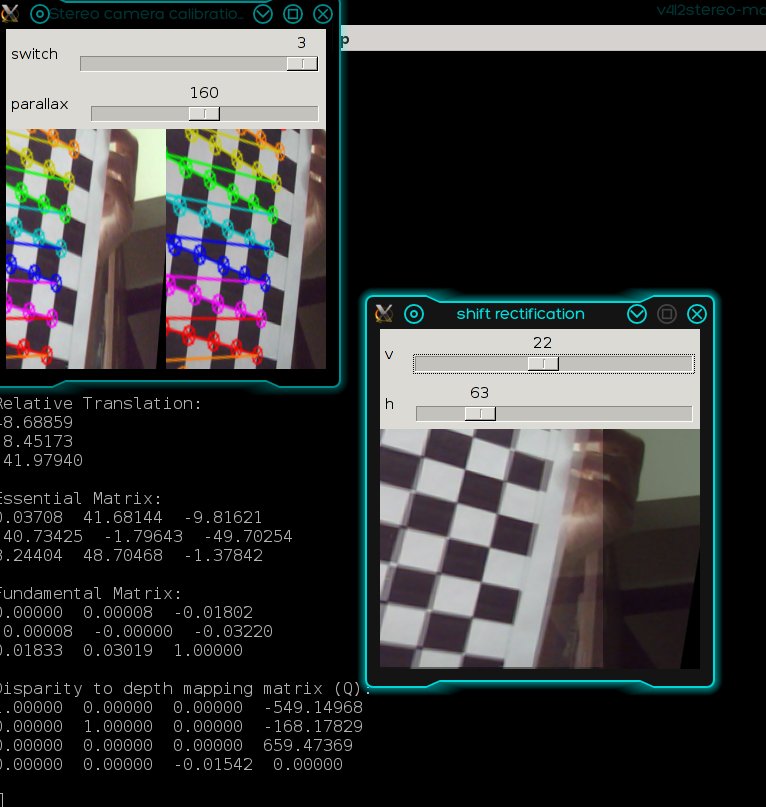
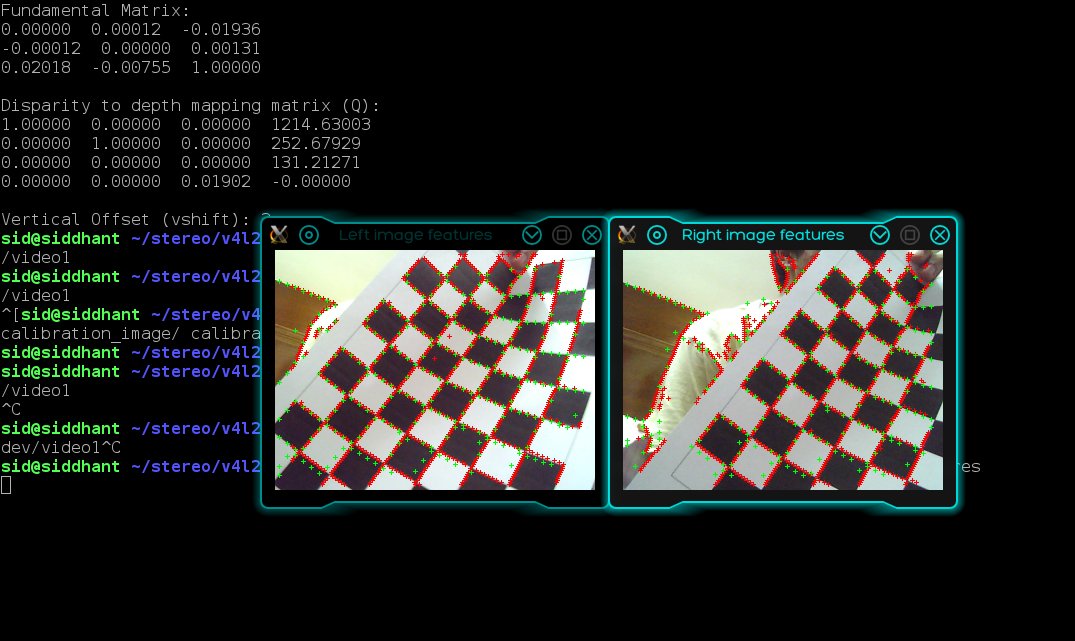
Basic Feature detection -
Closing remarks
This was a very hectic couple of weeks. The output I produced pales in comparison to the tinkering that I had been doing. I’ll be using all the important scripts that did not make it to the final repository in the documentation so that future students won’t have to wade through the insurmountable learning curve of Multimedia Streaming. All the work regarding this can be found here. I realized the overwhelming importance of IRC channels when I got help from #ffmpeg and #v4l2 channels when I was stuck with no end in sight. I gathered a GREAT DEAL of experience in Video Streaming which I hope will go a long way.
This has been one giant bi-weekly report. Thank you for reading. Ciao!